
I have seen plenty of articles and blog posts out there for how to setup and implement table partitioning, but very few for removing or undoing it. So I thought I would cover a few ways to accomplish this while still preserving the data.
There could be many reasons for removing partitioning: no longer needed, need to change partitioned tables, etc. But for our example, we just want to completely remove it from all tables. It would be nice if we could just drop the partition function and partition schema and SQL Server would handle all the rest, but it just isn’t that simple and that’s why DBAs were created.
The Problem – We have two partitioned tables (PartitionTable1 & PartitionTable2) split across four filegroups. We need to remove partitioning from the tables, remove the four files and filegroups, and then move all data to the PRIMARY filegroup without losing any data.
Sample Database – Start by creating a test database with a few filegroups and add some data files to those filegroups.
USE master;
GO
-- Create a test database.
CREATE DATABASE PartitionTest
    ON PRIMARY (
         NAME = N'PartitionTest'
        ,FILENAME = N'D:\MSSQL11.TEST1\MSSQL\DATA\PartitionTest.mdf'
        ,SIZE = 25MB, FILEGROWTH = 25MB)
    LOG ON (
         NAME = N'PartitionTest_log'
        ,FILENAME = N'D:\MSSQL11.TEST1\MSSQL\DATA\PartitionTest_log.ldf'
        ,SIZE = 25MB, FILEGROWTH = 25MB);
GO

USE PartitionTest;
GO
-- Add four new filegroups to the PartitionTest database.
ALTER DATABASE PartitionTest ADD FILEGROUP PartitionFG1;
GO
ALTER DATABASE PartitionTest ADD FILEGROUP PartitionFG2;
GO
ALTER DATABASE PartitionTest ADD FILEGROUP PartitionFG3;
GO
ALTER DATABASE PartitionTest ADD FILEGROUP PartitionFG4;
GO

-- Adds one file for each filegroup.
ALTER DATABASE PartitionTest
    ADD FILE
    (
        NAME = PartitionFile1,
        FILENAME = 'D:\MSSQL11.TEST1\MSSQL\DATA\PartitionFile1.ndf',
        SIZE = 25MB, MAXSIZE = 100MB, FILEGROWTH = 5MB
    )
    TO FILEGROUP PartitionFG1;
GO
ALTER DATABASE PartitionTest
    ADD FILE
    (
        NAME = PartitionFile2,
        FILENAME = 'D:\MSSQL11.TEST1\MSSQL\DATA\PartitionFile2.ndf',
        SIZE = 25MB, MAXSIZE = 100MB, FILEGROWTH = 5MB
    )
    TO FILEGROUP PartitionFG2;
GO
ALTER DATABASE PartitionTest
    ADD FILE
    (
        NAME = PartitionFile3,
        FILENAME = 'D:\MSSQL11.TEST1\MSSQL\DATA\PartitionFile3.ndf',
        SIZE = 25MB, MAXSIZE = 100MB, FILEGROWTH = 5MB
    )
    TO FILEGROUP PartitionFG3;
GO
ALTER DATABASE PartitionTest
    ADD FILE
    (
        NAME = PartitionFile4,
        FILENAME = 'D:\MSSQL11.TEST1\MSSQL\DATA\PartitionFile4.ndf',
        SIZE = 25MB, MAXSIZE = 100MB, FILEGROWTH = 5MB
    )
    TO FILEGROUP PartitionFG4;
GO
Create our partition function and then our partition scheme.
-- Creates a partition function called myRangePF1 that will partition a table into four partitions
CREATE PARTITION FUNCTION myRangePF1 (int)
    AS RANGE LEFT FOR VALUES (500, 1000, 1500);
GO

-- Creates a partition scheme called myRangePS1 that applies myRangePF1 to the four filegroups created above
CREATE PARTITION SCHEME myRangePS1
    AS PARTITION myRangePF1
    TO (PartitionFG1, PartitionFG2, PartitionFG3, PartitionFG4);
GO
Create the partitioned tables on the partition scheme; one (PartitionTable1) with a clustered index and one (PartitionTable2) with a non-clustered index.
-- Creates a partitioned table called PartitionTable1 with a clustered index
CREATE TABLE PartitionTable1 (col1 int IDENTITY(1,1), col2 datetime, col3 char(8000))
    ON myRangePS1 (col1);
GO

CREATE CLUSTERED INDEX [PK_col1] ON [dbo].[PartitionTable1]
    ([col1] ASC) ON [myRangePS1]([col1]);
GO

-- Creates a partitioned table called PartitionTable2 with a nonclustered index
CREATE TABLE PartitionTable2 (col1 int IDENTITY(1,1), col2 datetime, col3 char(8000))
    ON myRangePS1 (col1);
GO

CREATE NONCLUSTERED INDEX [IX_col2] ON [dbo].[PartitionTable2]
    ([col1],[col2] ASC) ON [myRangePS1]([col1]);
GO
Now add 2000 rows of dummy data to each table.
-- Insert dummy data.
INSERT PartitionTable1(col2,col3)
SELECT  CAST(CAST(GETDATE() AS INT) -2000 * RAND(CAST(CAST(NEWID() AS BINARY(8)) AS INT))AS DATETIME), REPLICATE('1',8000);
GO 2000

INSERT PartitionTable2(col2,col3)
SELECT  CAST(CAST(GETDATE() AS INT) -000 * RAND(CAST(CAST(NEWID() AS BINARY(8)) AS INT))AS DATETIME), REPLICATE('2',8000);
GO 2000
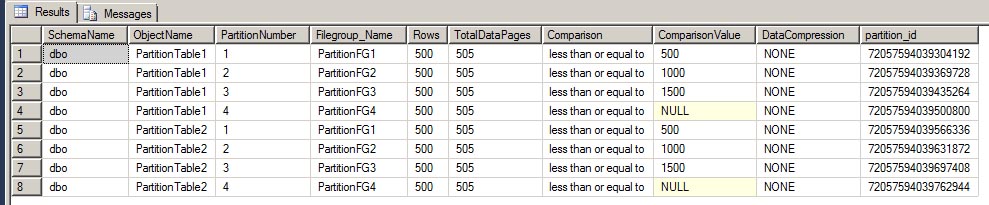
Let’s query the sys.partitions table and see what we have created.
-- Get partition information.
SELECT
     SCHEMA_NAME(t.schema_id) AS SchemaName
    ,OBJECT_NAME(i.object_id) AS ObjectName
    ,p.partition_number AS PartitionNumber
    ,fg.name AS Filegroup_Name
    ,rows AS 'Rows'
    ,au.total_pages AS 'TotalDataPages'
    ,CASE boundary_value_on_right
        WHEN 1 THEN 'less than'
        ELSE 'less than or equal to'
     END AS 'Comparison'
    ,value AS 'ComparisonValue'
    ,p.data_compression_desc AS 'DataCompression'
    ,p.partition_id
FROM sys.partitions p
    JOIN sys.indexes i ON p.object_id = i.object_id AND p.index_id = i.index_id
    JOIN sys.partition_schemes ps ON ps.data_space_id = i.data_space_id
    JOIN sys.partition_functions f ON f.function_id = ps.function_id
    LEFT JOIN sys.partition_range_values rv ON f.function_id = rv.function_id AND p.partition_number = rv.boundary_id
    JOIN sys.destination_data_spaces dds ON dds.partition_scheme_id =ps.data_space_id AND dds.destination_id = p.partition_number
    JOIN sys.filegroups fg ON dds.data_space_id = fg.data_space_id
    JOIN (SELECT container_id, sum(total_pages) as total_pages
            FROM sys.allocation_units
            GROUP BY container_id) AS au ON au.container_id = p.partition_id
    JOIN sys.tables t ON p.object_id = t.object_id
WHERE i.index_id < 2
ORDER BY ObjectName,p.partition_number;
GO
Here we can see both PartitionTable1 and PartitionTable2 are evenly split with 500 rows in each of the four partitions and each in a separate filegroup.
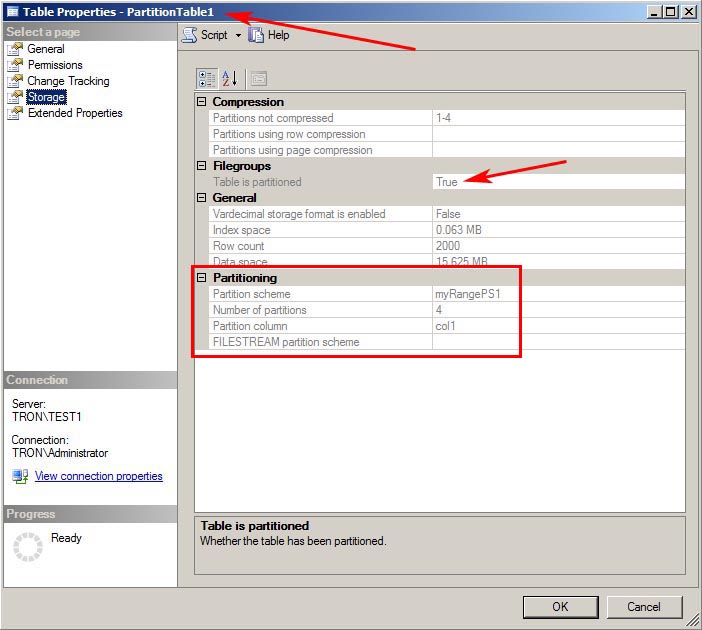
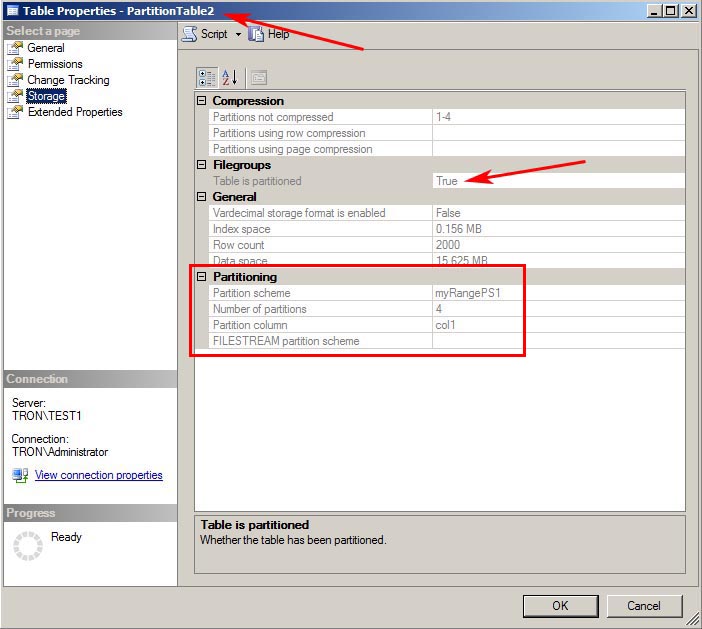
Within SSMS, you can also see each table is showing the partition scheme and the four partitions.
Solution for PartitionTable1 – This table has a clustered index which makes our solution pretty easy.
Since we have a partitioned clustered index, we can remove partitioning from this table by simply executing a single statement; CREATE INDEX using the DROP_EXISTING option and specifying a different filegroup. This will drop the current partitioned index (which includes the data) and recreate it on the PRIMARY filegroup all within a single command.
-- Quick and easy way to unpartition and move it.
CREATE CLUSTERED INDEX [PK_col1]
    ON [dbo].[PartitionTable1]([col1])
    WITH (DROP_EXISTING = ON)
    ON [PRIMARY];
GO
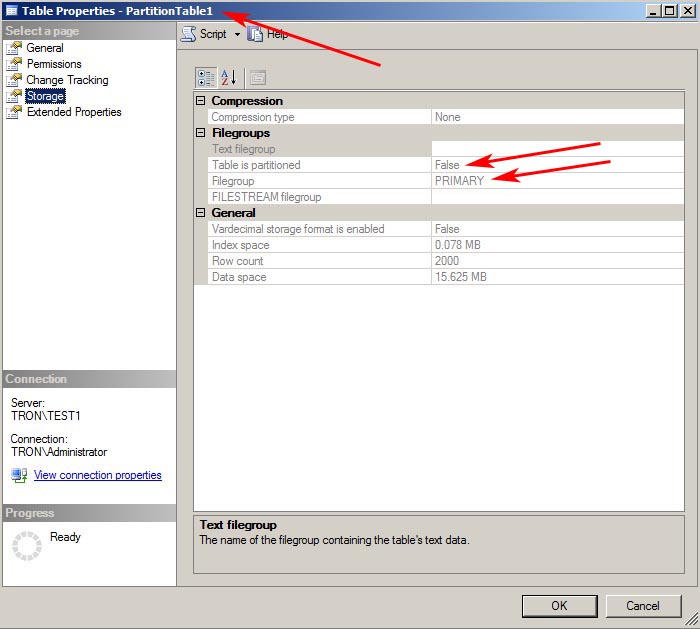
Now query the sys.partitions DMV again and you will see PartitionTable1 no longer shows up and only PartitionTable2 is remaining.

Once again in SSMS, you can will see PartitionTable1 now resides on the PRIMARY filegroup and its data still remains intact.
Solution for PartitionTable2 – We can’t use the previous index trick on the this table because it doesn’t have a clustered index. For this solution, we’ll need to use a few ALTER commands such as MERGE RANGE, NEXT USED, SPLIT RANGE, and SWITCH.
First we need to use the ALTER PARTITION FUNCTION MERGEcommand to combine all of the four partitions into a single partition. The MERGE RANGE command removes the boundary point between the specified partitions.
-- Merge all partitions into a single partition.
ALTER PARTITION FUNCTION myRangePF1() MERGE RANGE (500);
GO
ALTER PARTITION FUNCTION myRangePF1() MERGE RANGE (1000);
GO
ALTER PARTITION FUNCTION myRangePF1() MERGE RANGE (1500);
GO
Query the sys.partitions DMV again, and you will see that all 2000 rows have been combined, or merged, into a single partition and now reside on the PartitionFG4 filegroup.

Next, we need to use ALTER PARTITION SCHEME NEXT USED to specify the PRIMARY filegroup as the next partition.
-- Create next partition as PRIMARY.
ALTER PARTITION SCHEME myRangePS1 NEXT USED [PRIMARY];
GO
Then we need to use ALTER PARTITION FUNCTION SPLIT RANGEusing a partition value that is larger than the maximum value of your partition column. In our example, since we’re doing a RANGE LEFT partition then specifying any value greater than or equal to 2000 will do the trick. The SPLIT RANGEcommand will create a new boundary in the partitioned table.
-- Split the single partition into 2 separates ones to push all data to the PRIMARY FG.
ALTER PARTITION FUNCTION myRangePF1() SPLIT RANGE (2000);
GO
Query the sys.partitions DMV once again. You can see that PartitionTable2 is still partitioned into two partitions, but all 2000 rows now reside in the PRIMARYfilegroup.

At this point we’re only half way done. Now we need to create a non-partitioned table in the PRIMARY filegroup that matches the PartitionTable2 in every way, including any data types, constraints, etc. This new table will only be used as a temporary holding location for the data.
-- Create a new temporary non-partitioned table.
CREATE TABLE NonPartitionTable (col1 int IDENTITY(1,1), col2 datetime, col3 char(8000))
    ON [PRIMARY];
GO

CREATE NONCLUSTERED INDEX [IX_col2] ON [dbo].[NonPartitionTable]
    ([col1],[col2] ASC) ON [PRIMARY];
GO
Next we’ll use the ALTER TABLE SWITCH command to move the 2000 rows of data into the NonPartitionTable.
-- Switch the partitioned data into the temporary table.
ALTER TABLE PartitionTable2 SWITCH PARTITION 1 TO NonPartitionTable;
GO
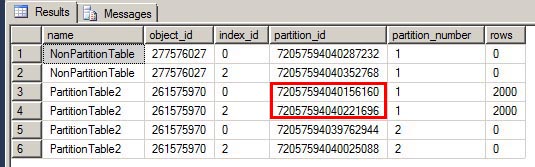
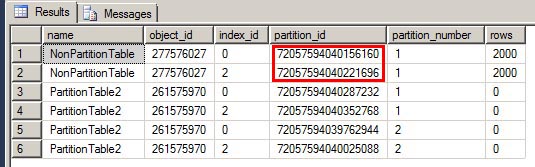
Query the sys.partitions DMV again to see there are now zero rows in the PartitionTable2.

The SWITCH command is very efficient because it’s just making a metadata change. Under the covers, no data is actually being moved; it’s just reassigning the partition_idof PartitionTable2 to the the NonPartitionTable object_id. If you want to really see the undercover action, then you can run this script before and after the SWITCH command to see the 2000 rows of data never leave the same partition_ids. Our data has never left partition_id 72057594040156160.
SELECT
     o.name
    ,o.object_id
    ,p.index_id
    ,p.partition_id
    ,p.partition_number
    ,p.rows
FROM sys.objects o
    JOIN sys.partitions p ON o.object_id = p.object_id
WHERE o.name IN ('PartitionTable2','NonPartitionTable')
ORDER BY o.name,p.partition_number;
GO
Before:
After:
Now that all the data has been moved to the temporary table, we can drop PartitionTable2 and rename the temporary table back to the original name.
-- Drop the partitioned table.
DROP TABLE PartitionTable2;
GO

-- Rename the temporary table to the original name.
EXEC sp_rename 'dbo.NonPartitionTable', 'PartitionTable2', 'OBJECT';
GO
At this point the PartitionTable2 is no longer partitioned.

Partitioning has now been completely removed from both PartitionTable1 and PartitionTable2. We can drop the remaining parts (partition schema, partition function,files, and filegroups) of partitioning to complete the clean up.
-- Remove the partition scheme, function, files, and filegroups.
DROP PARTITION SCHEME myRangePS1;
GO

DROP PARTITION FUNCTION myRangePF1;

GO
ALTER DATABASE [PartitionTest] REMOVE FILE PartitionFile1;
ALTER DATABASE [PartitionTest] REMOVE FILE PartitionFile2;
ALTER DATABASE [PartitionTest] REMOVE FILE PartitionFile3;
ALTER DATABASE [PartitionTest] REMOVE FILE PartitionFile4;
GO
ALTER DATABASE [PartitionTest] REMOVE FILEGROUP PartitionFG1;
ALTER DATABASE [PartitionTest] REMOVE FILEGROUP PartitionFG2;
ALTER DATABASE [PartitionTest] REMOVE FILEGROUP PartitionFG3;
ALTER DATABASE [PartitionTest] REMOVE FILEGROUP PartitionFG4;
GO
What we’re left with is a completely un-partitioned database, and all rows of data in each table completely intact.
Additional resources:


Thanks for writing the blog. Was very informative. All you require with partitioning.
Hey patrick – How are you? Very useful and Informative Post. A small correction though, under "solution for partitiontable1", your script is refering to table "[dbo].[PartitionTable]([col1])" instead of "[dbo].[PartitionTable1]([col1])". Append "1".
Thanks for pointing that out. It should be corrected now.
Select query is invalid, t. is not defined
Sean,
It looks like a formatting issue. It should be corrected now. Thanks!
thanks for post,it’s very useful and informative,all i need for partitioning
If all of your partitions are in the filegroup PRIMARY, do you still have to go through the steps of creating a new temporary table and moving all the data to it?
Yes. In the example for table #2, once you run the command “ALTER PARTITION FUNCTION myRangePF1() SPLIT RANGE (2000)”, it moves all the data to the PRIMARY filegroup but it still leaves the empty partition in filegroup PartitionFG4. The final step of creating the new table and “switching” the data into it is to completely remove all partitions.
Thanks for post. This information is a little hard to find and worked perfectly in my client.
The only thing is [PK_col1] is not actually a primary key, just a clustered index. If you do in fact have a primary key you’ll get a constraint error for the first solution (with drop_existing).
I am looking for the same , if you find any solution please let us know
Thanks for your information. i have a question: if my db have both of index ( clusterd index, non-clustered index) on 2 column, i can use solution one first, and then use solution second. That have something wrong with data on my db? Look forward to hearing from you soon. Thanks so muchs.
how to directly drop the partitions and table ? i do not want to preserver the data . just want to drop the table and all partition info with it. please explain. thanks.
Also note that any non-clustered indexes on partitioned tables must also be re-created with drop_existing or the partition scheme will not drop. These can be found with the partition search query without the ‘where’ clause. Unless this returns zero rows, there are still indexes using the partition scheme.