Before we get started, I want to make it clear this is NOT how you would normally configure all these items in a production environment. This is meant for a lab or demo area to play with Availability Groups over multiple subnets.
I use VMware a lot for demos at work as well as tooling around with various Windows and SQL Server related stuff. In working with Availability Groups, one of the things I would like to do for my demos is have multiple subnets in VMware Workstation, so I can simulate a site failover.
Just to test Availability Groups requires at least three VMs; one for the Active Directory domain controller, one for the primary replica, and one for the secondary replica. For this demo, we’ll still just need those three VMs.
I’m not going to cover all the steps to setup an Active Directory domain controller or install SQL Server. I’ll assume you have already completed those steps on each of the VMs. All three of my VMs are running Windows Server 2008 R2 Enterprise Edition. If you are running a different version, then some of these screenshots could be different.
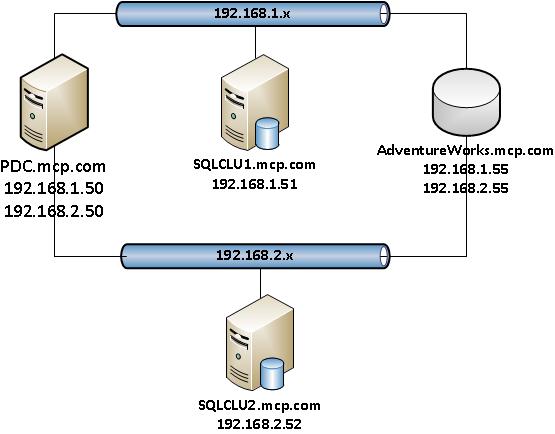
Here is the setup for each VM.
PDC
- Windows Active Directory Domain Controller (MCP domain)
- DNS server (mcp.com)
- Network Policy and Remote Access (used for routing)
- Connected to both 192.168.1.x and 192.168.2.x subnets
SQLCLU1
- SQL Server 2012 Enterprise Edition
- SPIRIT1 is the named instance listening on port 1433
- Connected to 192.168.1.x subnet
SQLCLU2
- SQL Server 2012 Enterprise Edition
- SPIRIT2 is the named instance listening on port 1433
- Connected to 192.168.2.x subnet
AdventureWorks2012AG
- Availability Group for the AdventureWorks2012 database
- Listening on port 1433
- Mapped to 192.168.1.55 and 192.168.2.55
Now that you see how the finished environment is setup, let’s see how to get there.
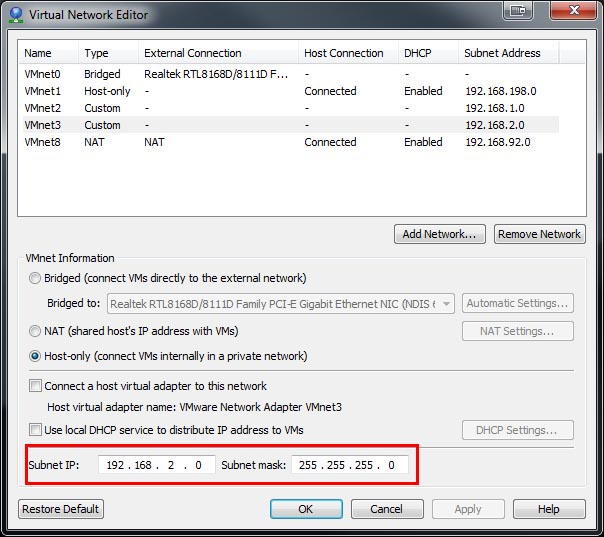
The first thing we need to do is setup each of the custom networks. From the VMware Workstation menu, open the Virtual Network Editor. Click on “Add Network” and select VMnet2. Select Host-only and uncheck both the “Connect to Host Virtual Adapter” and “Use local DHCP” options. Set the subnet IP to 192.168.1.0 and the subnet mask to 255.255.255.0.
Click “Add Network” and select VMnet3. Make all the same setting changes, but this time set the subnet IP to 192.168.2.0.
On the VM that is your Active Directory Domain Controller (PDC):
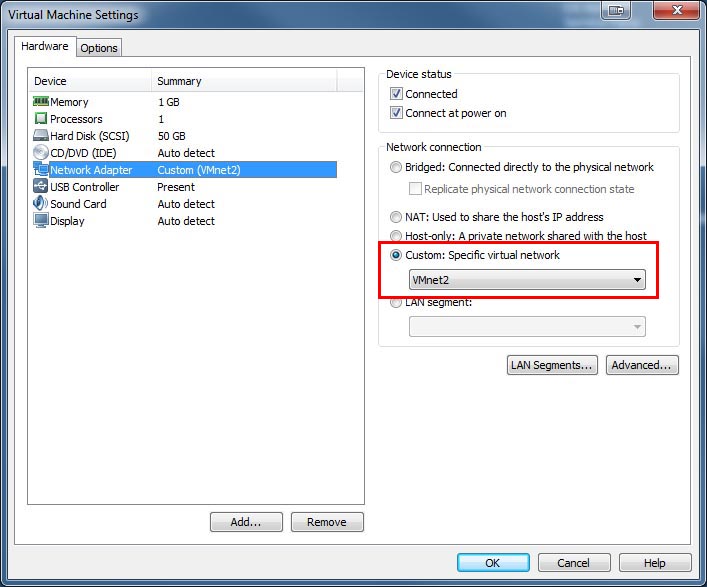
Edit the settings of the VM. Make sure you have only ONE network card, and assign it to VMnet2.
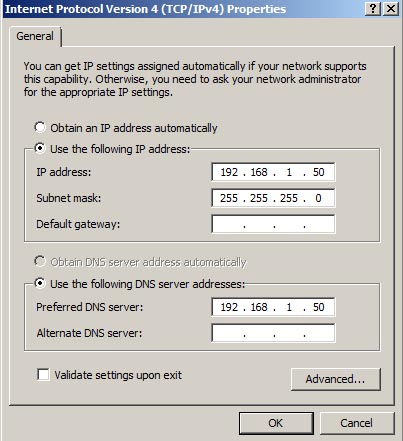
Power on your VM domain controller. Once it’s up, edit the IPv4 settings of your network card. Since we’re not using DHCP, we’ll need to hard code the IP address. I have my domain controller IP set to 192.168.1.50. You can set yours to any IP as long as it’s on the same subnet. Set the subnet mask to 255.255.255.0 and then leave the gateway blank. Set the preferred DNS server to 192.168.1.50, because this is also your DNS server. Save the changes and then shutdown the VM.
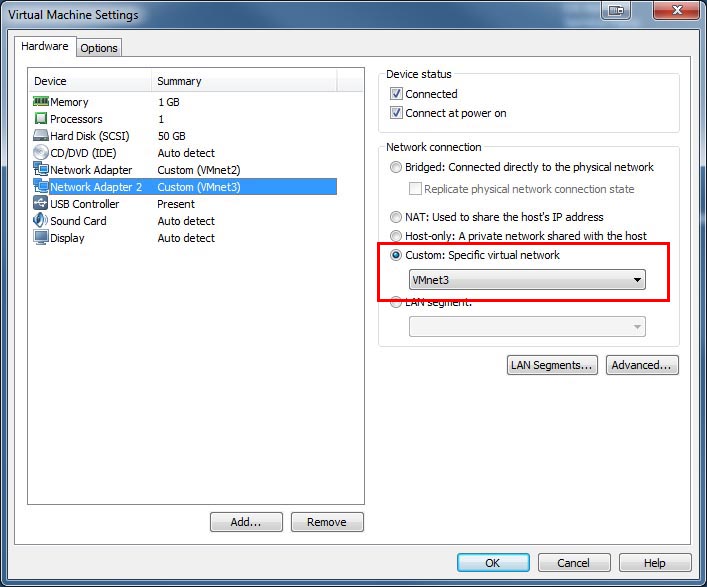
Edit the settings if the VM, add a 2nd network card and assign it to VMnet3.
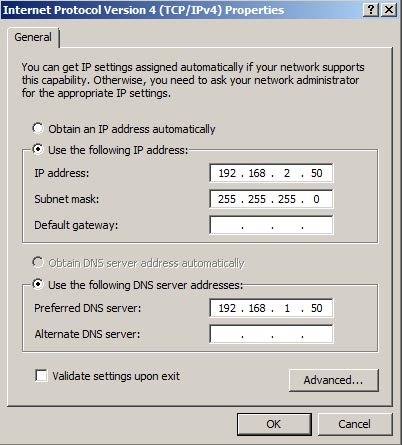
Power on the VM. Once it’s up, edit the IPv4 settings of the new network card. This time set the IP to 192.168.2.50, the subnet mask to 255.255.255.0, and the Preferred DNS server to 192.168.1.50. Save the changes.
Your PDC will act as a router between the two subnets, but it will need software to make it happen. Open Server Manager, select roles, and then “Add Role”. Select “Network Policy and Access Services”.
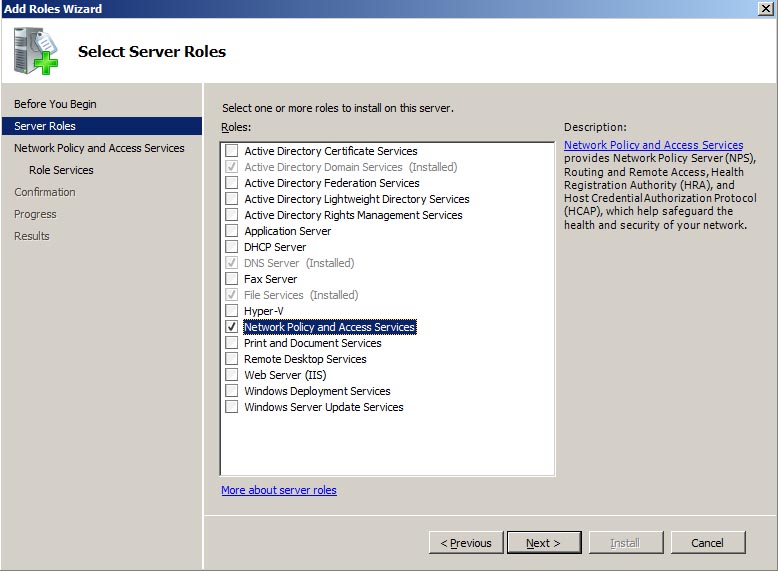
For the service role, select “Routing”. It will automatically select the other required services.
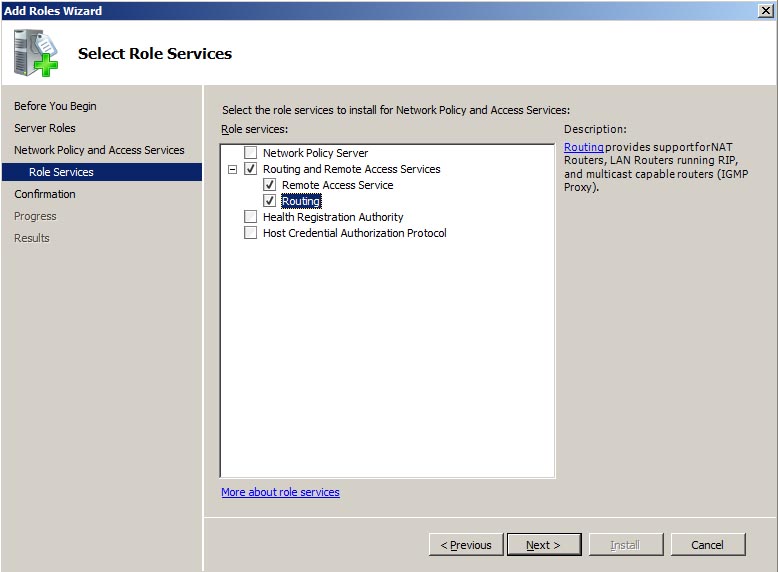
Click next and then install. Once the installation is complete, go to Administrative Tools and open “Routing and Remote Access”. Right click on the domain controller and select “Configure and Enable Routing and Remote Access”. From the wizard, choose “Custom Configuration” then click Next. Select “LAN Routing” then click next to complete the configuration.

When a pop up asks to start the service, click “Start Service”. Once the configuraiton is complete, you now have software routing enabled on your domain controller. The routing should be automatically configured between the two subnets.
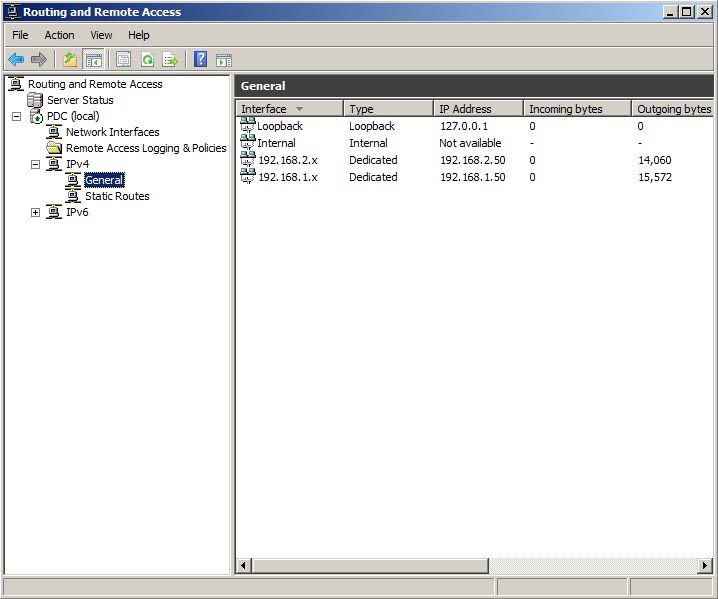
You would normally use a hardware router for this job, but the Routing and Remote Access service functions just fine for a lab running on VMware. The next step is to configure the network and IP settings for each of our SQL Servers.
On the first SQL Server VM (SQLCLU1):
Open the VM properties and make sure your network card is assigned to VMnet2.
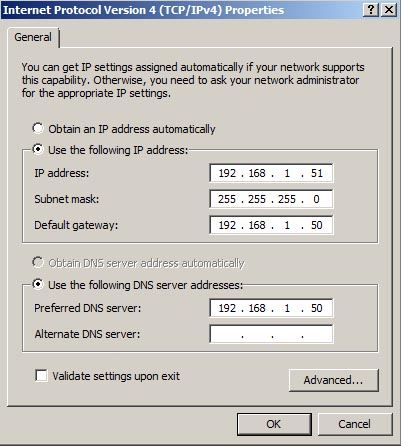
Save the settings and then power on the VM. Once it’s up, edit the IPv4 settings of the network card. Set the IP address to 192.168.1.51. Set the subnet mask to 255.255.255.0 and the default gateway to 192.168.1.50. The default gateway needs to be the IP address of the server that is running the Routing and Remote Access service. In this case, it’s the IP of the domain controller. Set the Preferred DNS server to 192.168.1.50. Click OK to save the settings.
Additionally, you will need to open firewall ports TCP 5022 for the HADR service, TCP 1433 for the SQL Server service, and UDP 1434 for the SQL Server Browser service.
On the second SQL Server VM (SQLCLU2):
Open the VM properties and make sure your network card is assigned to VMnet3.

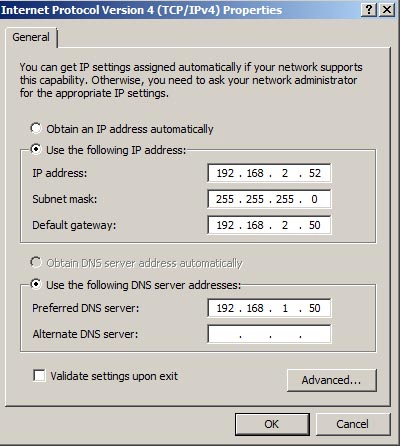
Save the settings and then power on the VM. Once it’s up, edit the IPv4 settings of the network card. Set the IP address to 192.168.2.52. Set the subnet mask to 255.255.255.0 and the default gateway to 192.168.2.50. The default gateway needs to be the IP of the 2nd network care we setup earlier on the domain controller. Set the Preferred DNS server to 192.168.1.50. Click OK to save the settings.
Additionally, you will need to open firewall ports TCP 5022 for the HADR service, TCP 1433 for the SQL Server service, and UDP 1434 for the SQL Server Browser service.
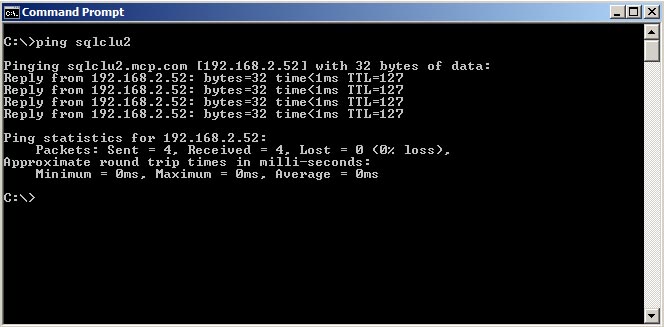
Your two subnets should be working now. If you want to test it, just open a command prompt from SQLCLU1 and issue a “PING SQLCLU2”. You can do the same test from SQLCLU2.
Setting up the Windows Cluster
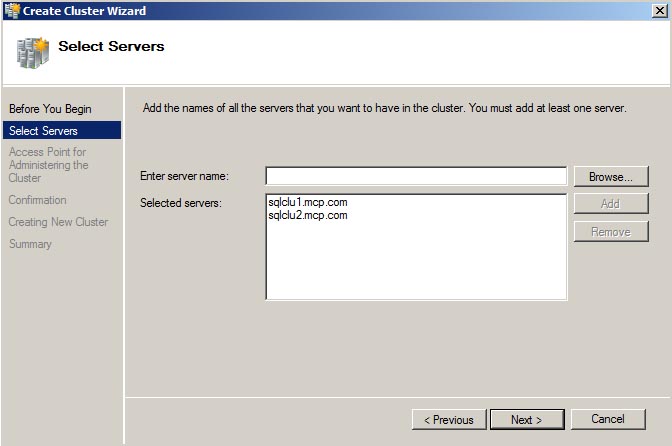
Open Failover Cluster Manager and click “Create a Cluster”. Step through the setup wizard by selecting the two cluster nodes: SQLCLU1 and SQLCLU2.
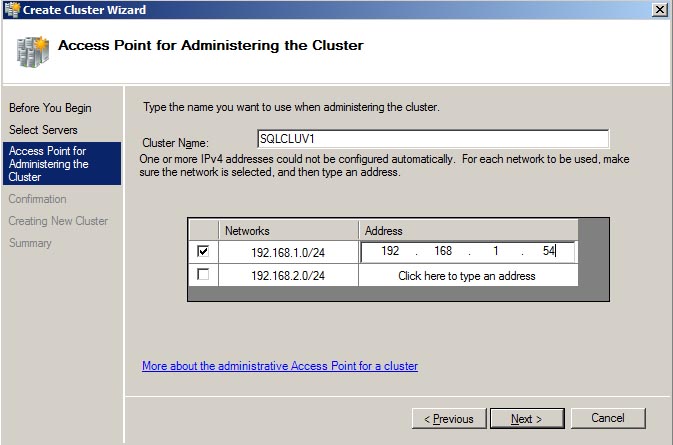
Key in the name of the cluster, SQLCLUV1. Select the 192.168.1.0/24 subnet and enter the IP address of 192.168.1.54. Make sure to uncheck the other subnet. Click next to finish the setup.
At this point we would normally configure the quorum; however, since this is just for a lab setup, we’ll leave the quorum set to Node Majority. When setting this up in a production environment, you’ll want to configure the quorum based on the number voting nodes. This link will guide you through what changes are needed.
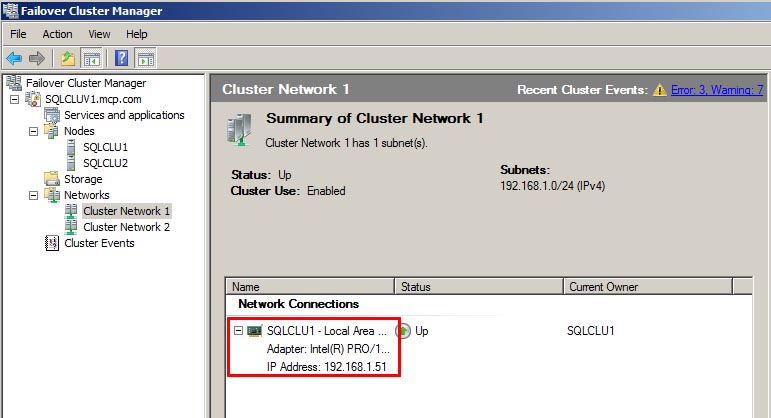
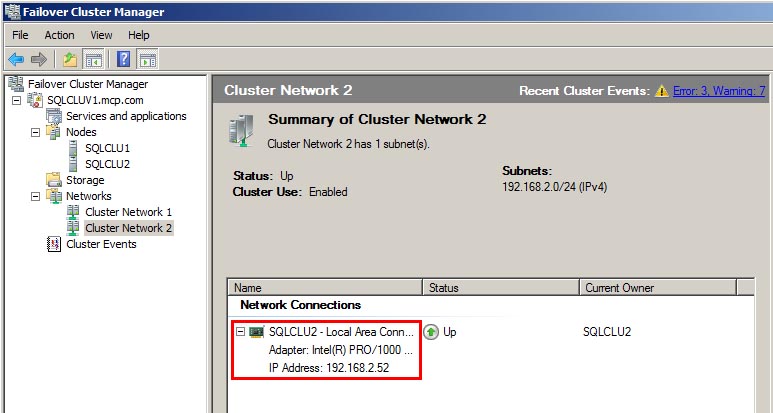
Look at the settings of each of the cluster networks. Cluster Network 1 is the 192.168.1.x subnet and is connected to SQLCLU1.
Cluster Network2 is the 192.168.2.x subnet and is connect to SQLCLU2.
Setting up the Availability Group
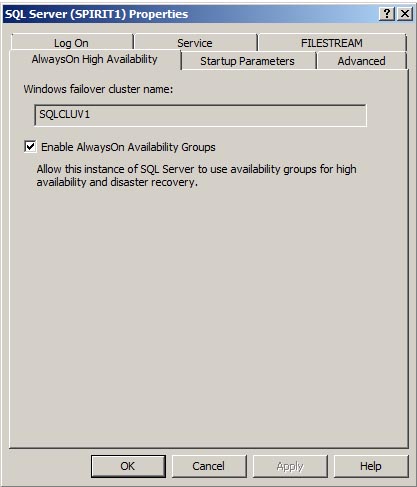
Now comes the easy part. First we’ll need to enable the Availability Group feature on each SQL Server instance. On SQLCLU1, open the SQL Server Configuration Manger. Right click on the SQL Server service and select properties. Select the “AlwaysOn High Availability” tab, and check the box to enable it. Click OK to save the changes, and then stop and restart the SQL Service services.
Make the change on the second SQL Server, SQLCLU2.
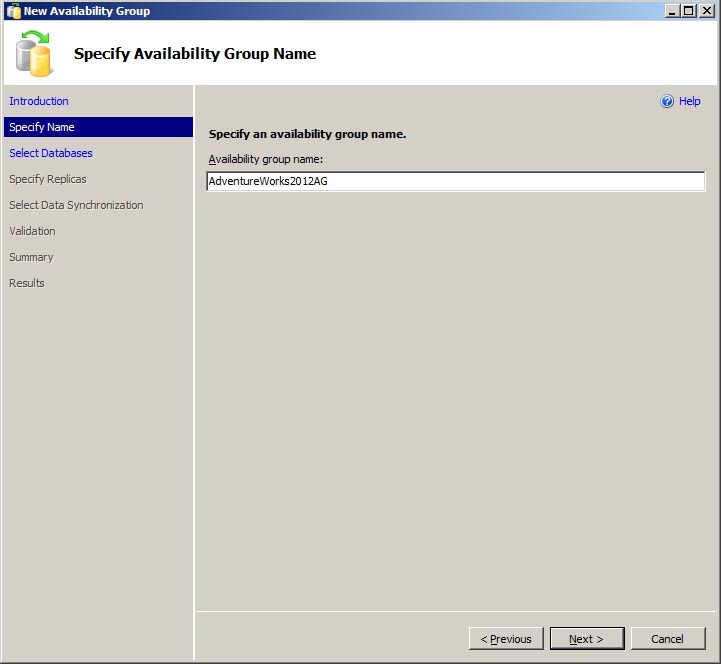
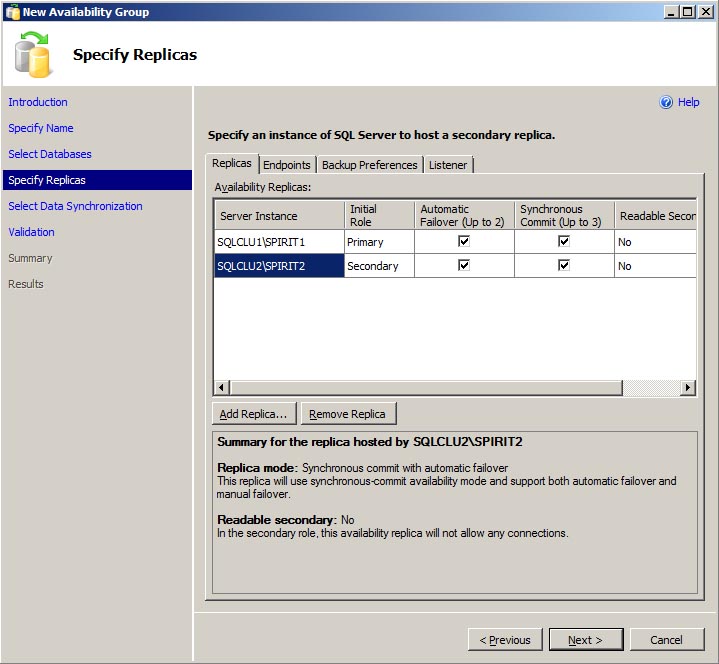
Now make sure the AdventureWorks2012 database is in FULL recovery mode. Within SQL Server Management Studio we’ll setup the Availability Group for the AdventureWorks2012 database. Open Object Explorer to SQLCLU1SPIRIT1. Right click on the “AlwaysOn High Availability” node and select “New Availability Group Wizard”. Enter a name for the group, AdventureWorks2012AG and click next.
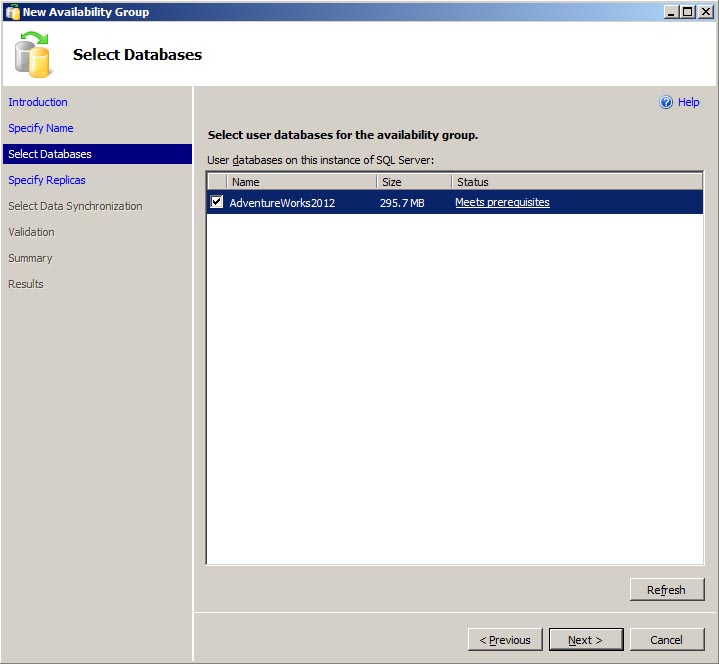
Check the box next to the AdventureWorks2012 database and click next.
Click Add Replica and add SQLCLU2SPIRT2 to the list of replicas. Check all the boxes for Automatic Failover and Synchronous Commit.
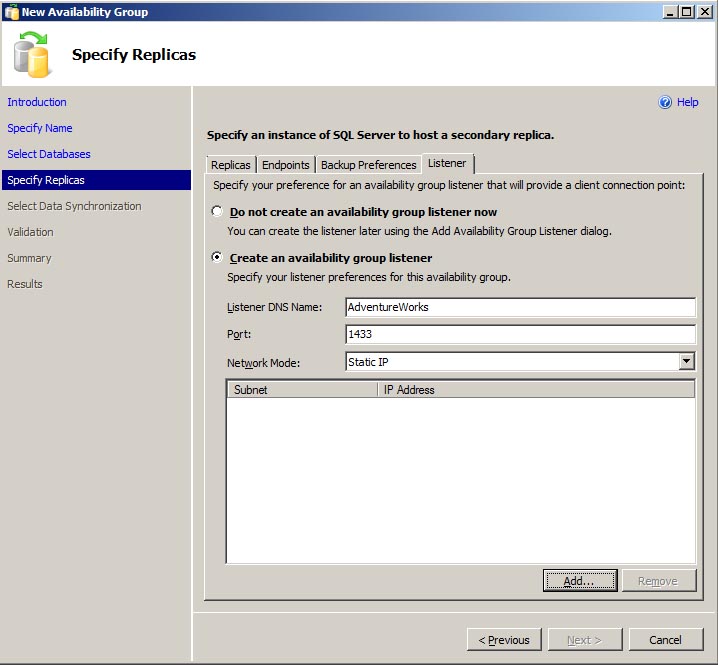
Click the Listener tab. Select the “Create an Availability Group Listner” radio button, then enter a listener name and port number and make sure Static IP is selected for Network Mode.
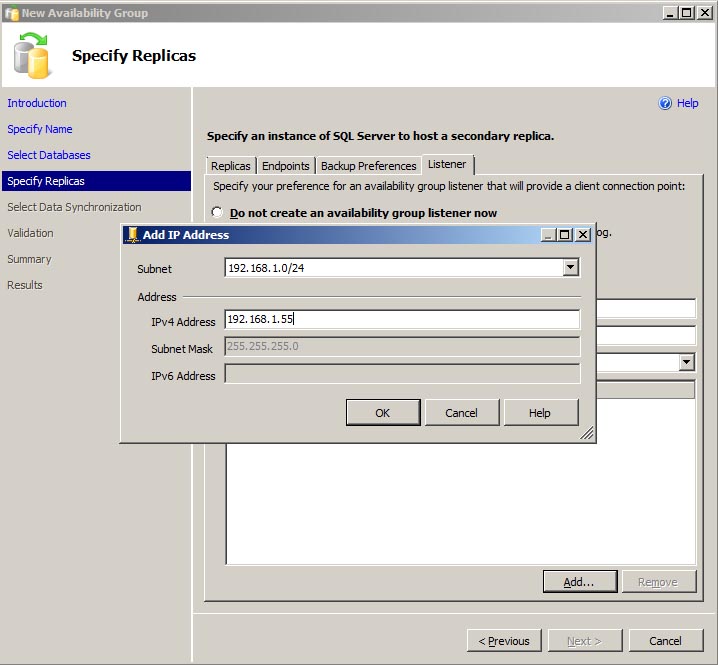
Click the Add button. Select the 192.168.1.0/24 subnet and enter the IP of the listener, 192.168.1.55, then click OK.
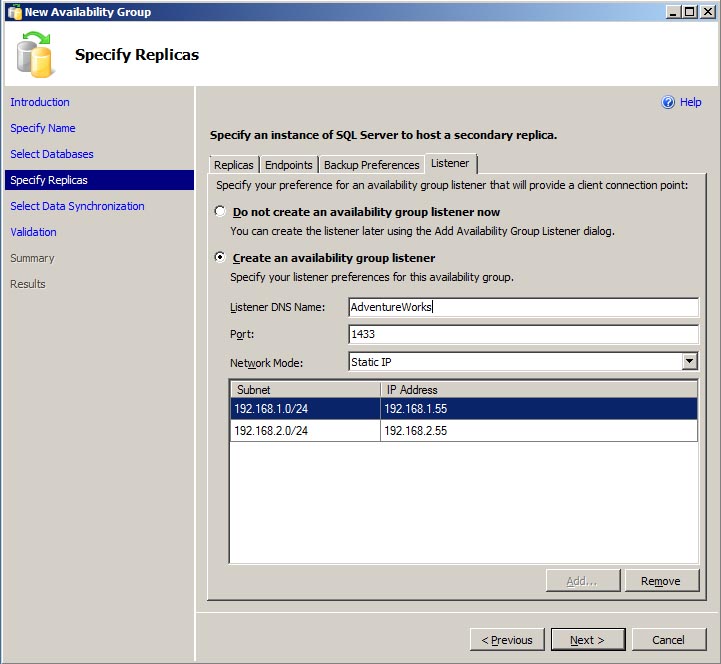
Click the Add button again. Select the 192.168.2.0/24 subnet and enter the second IP of the listener, 192.168.2.55, then click OK. You should now see 2 separate IP address for the listener. Click Next to continue.
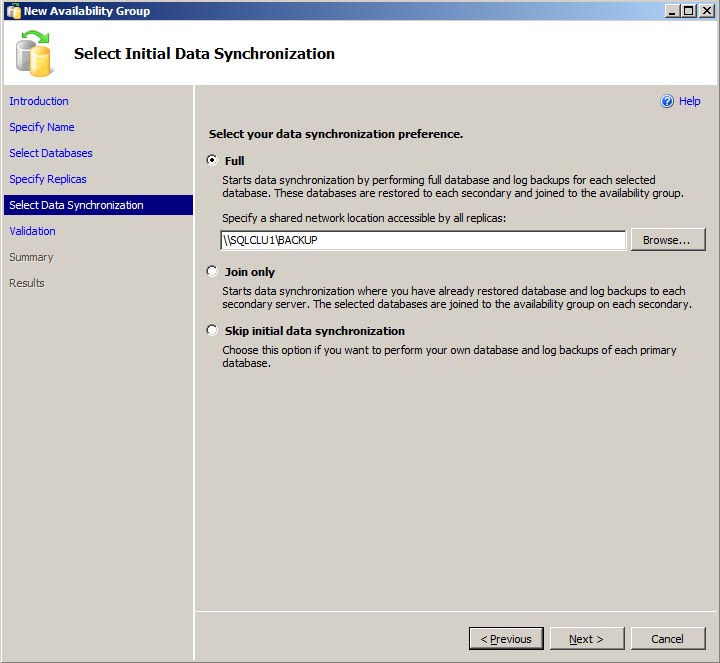
Select FULL data synchronization and specify a backup file share, \SQLCLU1BACKUP, and click next. The file share is only needed to complete the initial data synchronization.
Verify all the validation checks are successful and then click next. Click finish to complete the Availability Group setup.
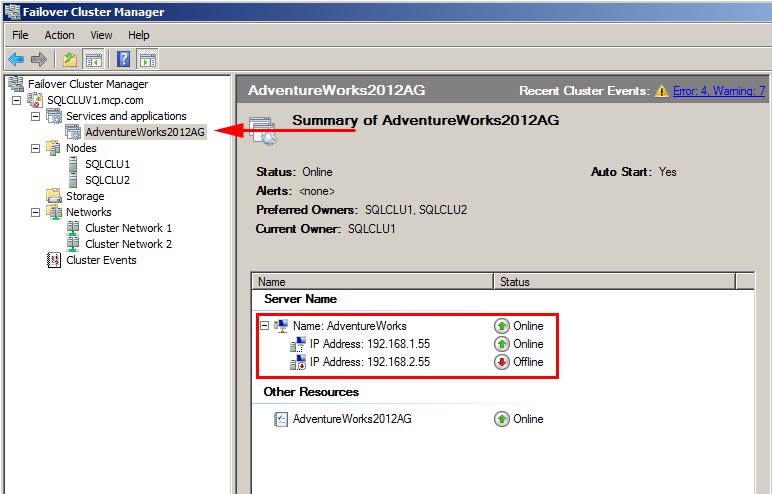
Once the setup is complete, go back into Failover Cluster Manager to check out the Availability Group resource that was added. What you’ll notice is two IP addresses associated to the Availability Group listener. One is currently online and the other is offline. The IP that’s online is associated to the subnet that SQLCLU1 is on, because it’s currently the primary replica.
Now let’s failover the Availability Group to SQLCLU2SPIRIT2 to see what happens to the listener. Open a query window to SQLCLU2SPIRIT2 and run the following code.
ALTER AVAILABILITY GROUP AdventureWorks2012AGFAILOVER;
Once the failover is complete, go back into Failover Cluster Manager to check out the properties of the Availability Group. You’ll notice the IP resources have switched. The IP 192.168.1.55 is offline and 192.168.2.55 is online.
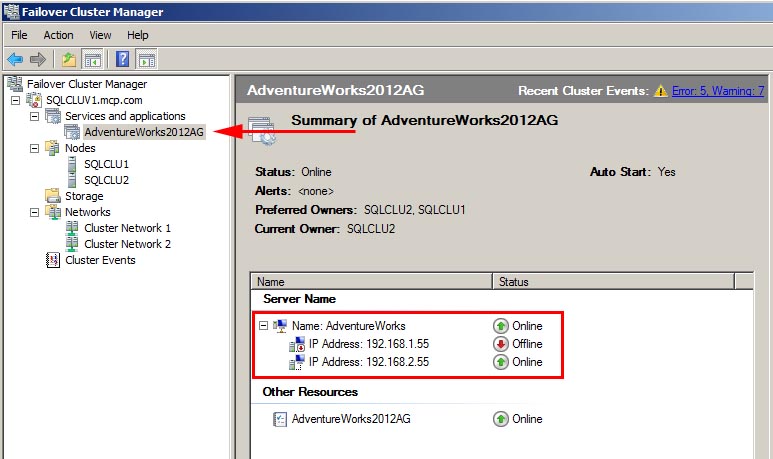
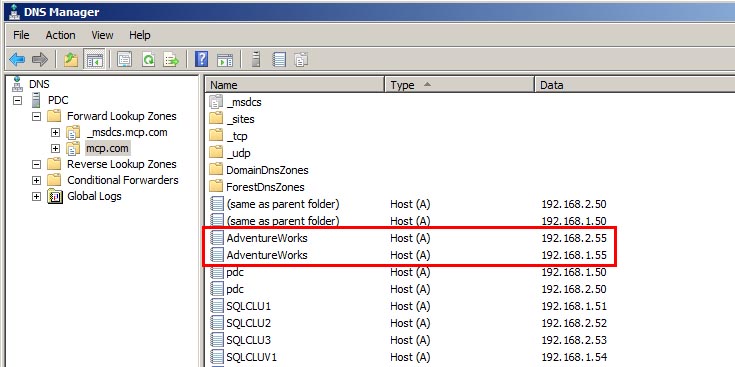
SQLCLU2SPIRIT2 is now the primary replica for the Availability Group and it’s on the 192.168.2.x subnet. You can also go back to the domain controller and open up the DNS Manager. There you will see the two DNS entries for the the Availability Group listener; one for each IP address.
What we’ve covered here is a quick and easy way to setup an Availability Group on multiple subnets within VMware Workstation. Remember this is not how you would normally setup everything within a production environment. In a production environment we’d use a hardware router instead of the routing service, the separate subnets would likely be in different data centers, and the quorum would be configured according the number voting nodes. However, this provides you with a platform for doing multisubnet failovers with Availability Groups.